ST-NMXC44A 48Gbps 4x4 HDMI™ Matrix
ST-NMXC44A 48Gbps 4x4 HDMI™ Matrix
The 48Gbps 4x4 HDMI Matrix supports the transmission of high resolution video (up
to 4K2K@120Hz 4:4:4 12bit and 8K4K@60Hz 4:2:0 12bit) and multi-channel digital
audio from 4 HDMI sources to 4 HDMI displays. Resolution downscaling and HDR
conversion for each HDMI output are also supported.
It works with Blue-Ray players, Set-Top boxes, Home Theater PCs, and game
consoles which connect to an HDMI display, and can be controlled via front panel
buttons, IR remote, RS-232, and Web GUI.
Features
☆ HDCP2.3compliant
☆ 4×HDMI inputscan be independently routed to 4 × HDMI outputs
☆ Videoresolution is up to 8K60Hz 4:2:0, 8K30Hz 4:4:4 and 4K120Hz 4:4:4, as
specified in HDMI 2.1
☆ Support48Gbps video bandwidth
☆ HDR,HDR10,HDR10+,Dolby Vision pass-through
☆ Support resolution downscaling and HDR conversion for each output port
☆ VRR,ALLM,QMS,QFT, SBTM aresupported
☆ Support optical audio and balanced analog audio output
☆ AdvancedEDIDmanagement
☆ Control via front panel buttons, IR remote, RS-232, and Web GUI
Package Contents
① 1×48Gbps4×4HDMIMatrix
② 1×24V/2.7ALocking Power Adapter
③ 1×IRRemote
④ 1×IRWidebandReceiver Cable (12V, 1.5m)
⑤ 1×ACPowerCord(1.5m)
⑥ 1×RS-232Serial Cable(1.5m, male to female head)
⑦ 4×5pin-3.81mmPhoenix Connector
⑧ 8×MachineScrew(KM3*6)
⑨ 2×MountingEar
⑩ 1×UserManual
Specifications
| Parameter | Description |
|---|---|
| Video | |
| HDMI Compliance | HDMI 2.1 |
| HDCP Compliance | HDCP 2.3 |
| Video Bandwidth | 48 Gbps |
| Video Resolution | Up to 8K@60Hz 4:2:0, 8K@30Hz 4:4:4 and 4K@120Hz 4:4:4 |
| Color Space | RGB 4:4:4, YCbCr 4:4:4, YCbCr 4:2:2, YCbCr 4:2:0 |
| Color Depth | 8/10/12-bit |
| HDR Formats | HDR, HDR10, HDR10+, Dolby Vision, HLG |
| Gaming Features | VRR, ALLM, QMS, QFT, SBTM supported |
| Video Latency | No Latency |
| Audio | |
| HDMI Audio Formats | LPCM, Dolby Digital/Plus/EX, Dolby TrueHD, Dolby Atmos, DTS, DTS-EX, DTS-96/24, DTS High Res, DTS-HD Master Audio, DSD |
| Optical Audio Output | LPCM 2.0CH / Dolby / DTS 5.1CH |
| Balanced Analog Audio Output | LPCM 2CH |
| Audio Latency | No Latency |
| Connection | |
| Input Ports | 4× HDMI INPUT (Type A, 19-pin female) |
| Output Ports | 4× HDMI OUTPUT (Type A, 19-pin female), 4× Optical Audio (S/PDIF), 4× L/R Audio (5-pin 3.81mm Phoenix connector) |
| Control Ports | 1× TCP/IP (RJ45), 1× RS-232 (D-Sub 9), 1× IR EXT (3.5mm Stereo Mini-jack) |
| Recommended HDMI Cable Length | |
| 8K | Up to 3 m / 9.8 ft — Ultra High Speed HDMI 2.1 cable required |
| 4K@60Hz | Up to 5 m / 16 ft |
| 4K@30Hz | Up to 10 m / 33 ft |
| 1080P | Up to 15 m / 49 ft |
| Protection | |
| ESD Protection | ±8 kV (Air-gap discharge), ±4 kV (Contact discharge) — IEC 61000-4-2 |
| Physical | |
| Housing | Metal Enclosure — Black |
| Dimensions | 440 × 203 × 44.5 mm (W × D × H) — 1U Rack Mount |
| Weight | 2.65 kg |
| Power | |
| Power Supply | Input: AC 100–240V 50/60Hz; Output: DC 24V/2.7A (US/EU standard, CE/FCC/UL certified) |
| Power Consumption | 35 W (Max) |
| Environment | |
| Operating Temperature | 0°C – 40°C / 32°F – 104°F |
| Storage Temperature | -20°C – 60°C / -4°F – 140°F |
| Operating Humidity | 20% – 80% RH (non-condensing) |
| Storage Humidity | 10% – 90% RH (non-condensing) |
Front Panel

| No. | Name | Function Description |
|---|---|---|
| 1 | LCD Screen | Displays matrix switching status, input/output port, EDID, baud rate, IP address, etc. |
| 2 | PWR Indicator | Green: device is working normally. Red: device is on standby. |
| 3 | IR | IR signal receiver. Receives the signal from the IR remote. |
| 4 | INPUT / OUTPUT Buttons | Press an OUTPUT button (1~4) first, then press an INPUT button (1~4) to select the corresponding input source for the output port. |
| 5 | MENU / ENTER / UP / DOWN | Navigate the LCD menu. Example — RESET: Press MENU → select SETUP → press ENTER → select RESET → press ENTER to confirm. Press MENU at any time to return to the previous menu. |
| 6 | POWER Button | Long press for 1 second to enter standby mode. Short press to wake the device. |
| 7 | LOCK Button | Short press to lock front panel buttons (except POWER). Press again to unlock. |
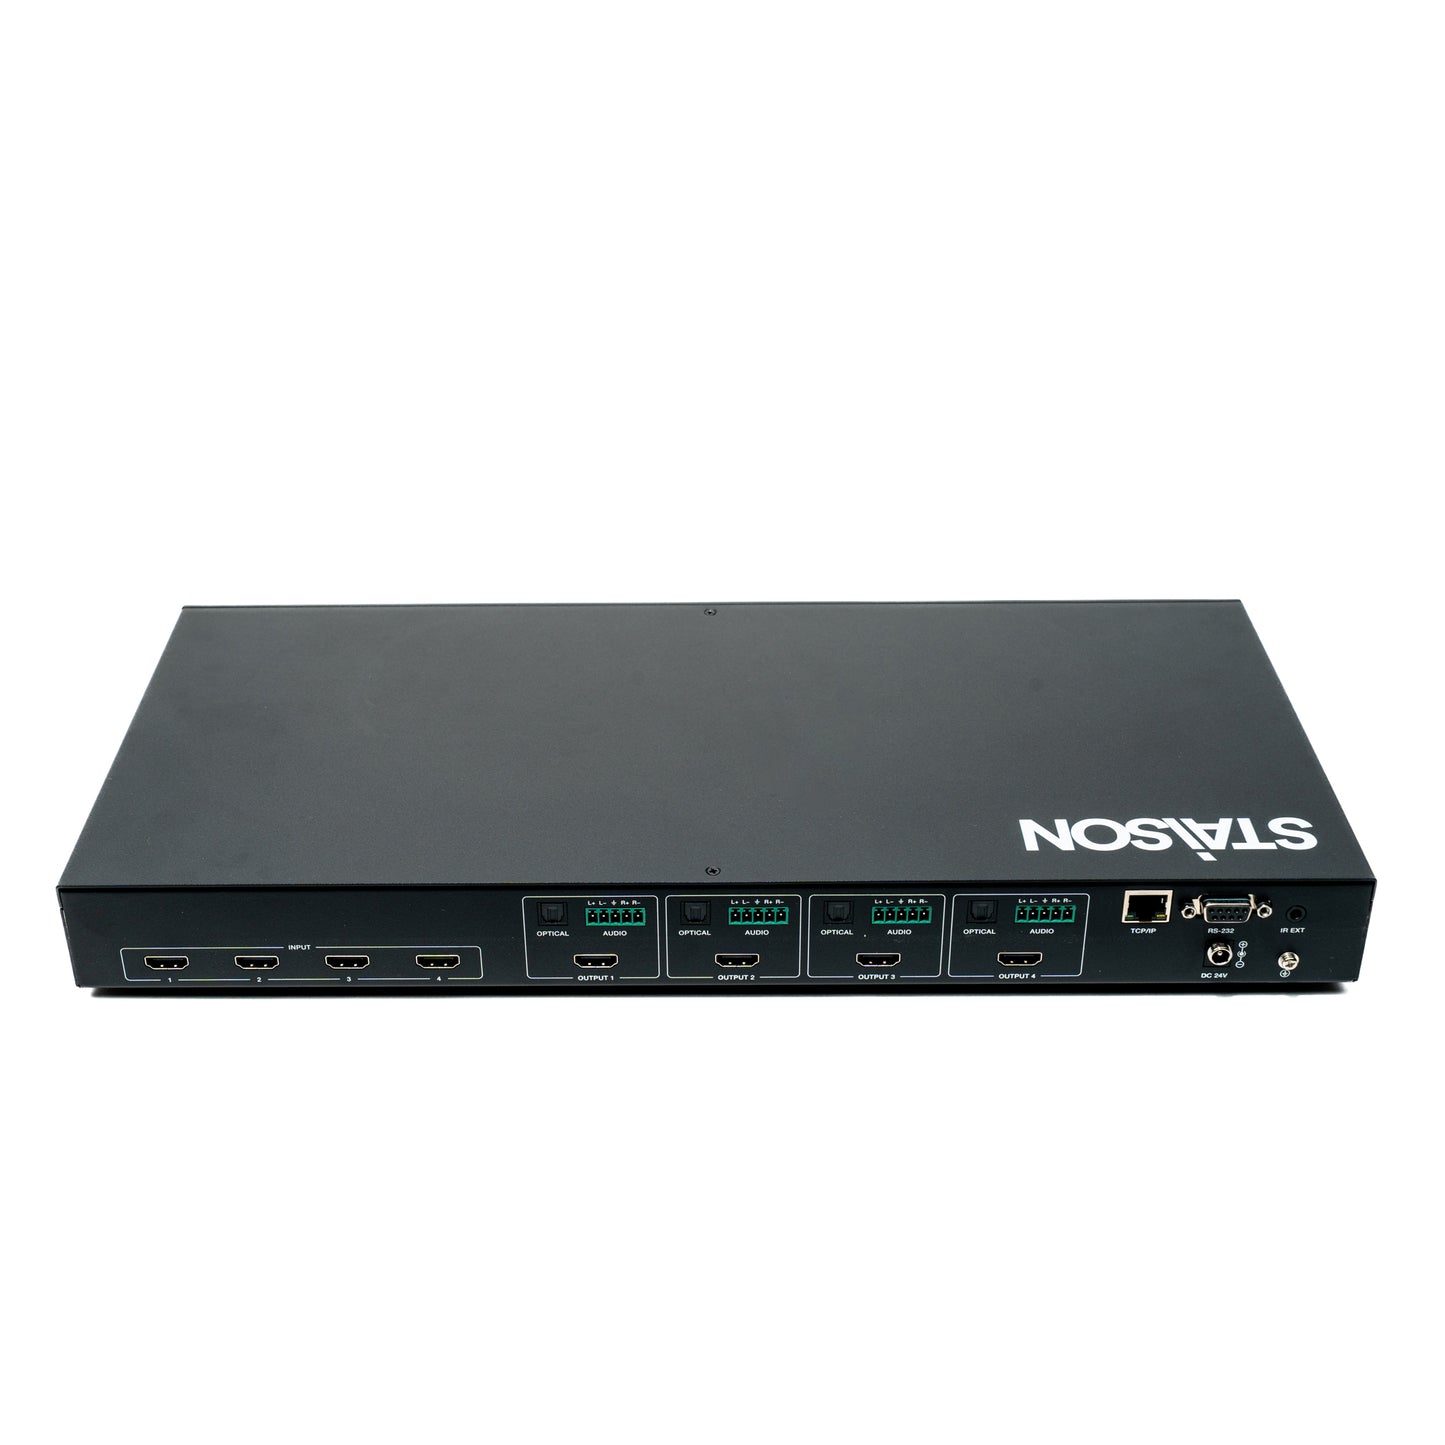
Rear Panel

| No. | Name | Function Description |
|---|---|---|
| 1 | AUDIO OUT (1~4) | OPTICAL: Optical audio output port, connect to an audio output device such as an amplifier. L/R AUDIO: Analog audio output port supporting balanced/unbalanced output (max 2Vrms). Balanced: L+, L-, GND, R+, R-. Unbalanced: L+, GND, R+. |
| 2 | TCP/IP | TCP/IP control port. Connect to a PC or router with an RJ45 cable. |
| 3 | RS-232 Port | Connect to a PC or control system with a D-Sub 9-pin cable to transmit RS-232 commands. |
| 4 | IR EXT | If the IR receiver window is blocked or the unit is installed out of infrared line of sight, insert the IR receiver cable here to receive the IR remote signal. |
| 5 | HDMI INPUT Ports (1~4) | HDMI input ports. Connect to HDMI source devices (e.g. 8K PC, DVD, set-top box) with HDMI cables. |
| 6 | HDMI OUTPUT Ports (1~4) | HDMI output ports. Connect to HDMI display devices (e.g. TV, monitor) with HDMI cables. |
| 7 | DC 24V | Connect to the 24V/2.7A locking power adapter. |
| 8 | GND | Connect the housing to the ground. |
IR Remote

| Button | Function Description |
|---|---|
| ① Power | Power on the Matrix or set it to standby mode. |
| ② Output A — 1/2/3/4 | Press 1, 2, 3 or 4 to select the corresponding input source for HDMI OUTPUT 1. |
| ③ Output B — 1/2/3/4 | Press 1, 2, 3 or 4 to select the corresponding input source for HDMI OUTPUT 2. |
| ④ Output C — 1/2/3/4 | Press 1, 2, 3 or 4 to select the corresponding input source for HDMI OUTPUT 3. |
| ⑤ Output D — 1/2/3/4 | Press 1, 2, 3 or 4 to select the corresponding input source for HDMI OUTPUT 4. |
| ◄ / ► (per output) | Press to select the previous or next input source. |
The first way: The IR window accepts the IR remote signal. Using the IR remote, the
furthest distance is 8 meters when the IR remote is directly faced to the matrix, and 5
meters when the using angle is ± 45°. The diagram is shown as below:

The second way: If the IR receiver window of the Matrix is blocked or the Matrix is
installed in a closed area out of infrared line of sight, the IR receiver cable can be
inserted to the “IR EXT” port to receive the IR remote signal. The furthest distance of
using the IR remote is 5 meters when the IRremote is directly faced to the IR receiver
head, and 3 meters when the using angle is ± 45°. The diagram is shown as below.

IR Cable Pin Assignment

EDID Management
This Matrix has 36 factory defined EDID settings, 3 user-defined EDID modes and 4
copy EDID modes. You can select defined EDID mode or copy EDID mode to input
port through front panel buttons, RS-232 control or Web GUI.
On-panel button operation: On the initial LCD display screen, press “MENU”
button to enter the first level menu, press “UP/DOWN” button to select INPUT, and
then press the “ENTER” button. Now the EDID item appears. Press the “ENTER”
button, and then press “UP/DOWN” button to select the EDID mode you need. Then
press “ENTER” button to confirm this operation.

RS-232 Control Command
The product also supports RS-232 control. You need a serial cable with RS-232
male headandDB9transfer USB malehead.The RS-232headof theserialcable is
connected to the RS-232 control port with DB 9 at the rear of the Matrix, and the USB
head of the serial cable is connected to a PC. The connection method is as follows:

Application Example

Product features
Product features
Materials and care
Materials and care
Merchandising tips
Merchandising tips